I had an email from a customer who's Mum was 80 last Friday and she had just purchased one of these caravans. The customer then proceeded to ask me if I could make a template for her of one of these so she could cut on her machine and make up for her Mum for her Birthday... I then replied to her email asking when she wanted the template...... she replied Tomorrow So I had to get a move on. And after 8 solid hours and 45 mins I designed cut and assembled this below.
customer was over the moon with her template..
It was your little beach hut that sparked the idea.
We can sit in your hut or under the palm trees and watch the Punch & Judy show and later we can take the boat out for some fishing. All we need then is a donkey ride and for the ice cream man to come along and we're all set for a perfect day at the seaside...
Rosemary
Here's the Ice Cream Van Rosemary - Sorry no Man to go with it
Pics not very good I'm afraid, but I think you get the idea. Hope its ok.
Well I gave you the cross ealier and I have used the same cross again with this card which I have designed in inkscape from shapes and cut from acetate, I have again embossed with folders as you can see I love them embossing folder's,,
But the flower makes a lovely show if you were to do a few
This was a job and a half getting the acetate to stick without seeing it... I have made completely from acetate except for the base and the middle..With the trimmings I used perfumed card . I have designed in Inkscape and exported as I normally do and cut on my beloved Craft ROBO..
I have used flat backed pearls to hide the glue used to stick the acetate which was quite easy to do as the edges are scalloped so hides the glue well..
I then cut a ribbon garland to put to the front and on the lid of the globe and layered the bows and topped them with Mulberry flowers. Inside is a bride and groom under the Wedding Arch which has bells hanging from the top.. You can't really see inside which is a shame because it looks lovely close too..
On a roll now my mojo's returned with a vengence and I have designed this with Father's Day in mind but really any golfer would be pleased to receive this for a Birthday....
Made this to put in some homemade cookies for a friend who was a little bit poorly and needed chhering up...
But has lots of uses - great for easter just fill with sweets or chocolate egg(s) and deocrate with chicks or maybe you could squeeze in 2 cupcakes.
Why not put in some toiletries well the possibilities are endless.
approx size 6.5" x 3.5" x 4.75" (lowest height)
Available in GSD, KNK, AI, WPC, SVG
This little can is handy for filling with paper flowers. I made my first one a few years ago when visiting someone in hospital and couldn't take real flowers.
It's easy enough to put together, the fiddliest bit is curving the ends of the front flap inside the body of the can but even that's not too difficult.
The outer handle has each end folded flat (makes a 'D' shape) and the flat bits get glued to the back.
If anyone would like the DXF file, please PM me.
Last edited by heleno; 15-04-2010 at 09:35 AM.
It is incomprehensible to me but the relevance and importance is overwhelming.
Hi All. Here's a 3D wheel Barrow for you to try it stands about 9cm high and 19cm long. It's should be easy for you to build if you look at the picture. plastic drinking straws are inserted in the barrow shafts to aid glueing they can be removed when the glue as stuck! don't wait until dry, as you won't get them out.
The legs are cut through 3 sides leaving one side uncut(found best to leave the glued double side) then insert a bendy straw into leg making sure the bend of straw is across your cut and compressed so the straw will bend and stay in shape (Try it out of leg to see how it will stay in shape when compressed)
glue all the wheel parts together for strength use a piece of straw to keep them in line, best to press the glued pieces flat until set. Space the wheel with the square shaft material between axle supports and use drinking straw for the axle, pulling the straw through until the convoluted part of the bendy straw just clicks into the axle support this keep axle in place
Last edited by barn owl; 07-05-2010 at 10:50 AM.
Reason: added more instruction
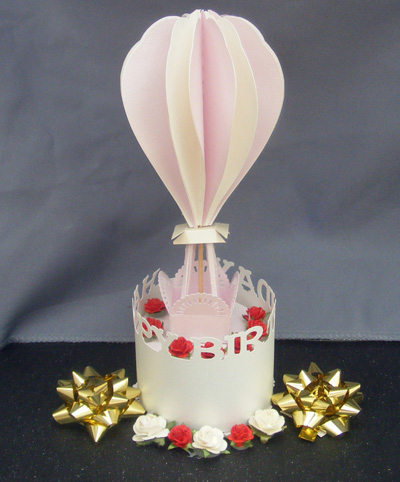
Well I have been working on this for quite sometime really and I wasn't getting anywhere.. Firstly it was too heavy then I couldn't work out how big the basket should be then came oh what do I put it on... All these decisions are not easy when time is of the essence
Anyway it's now finished and ready to fly to whoevers house has a Birthday.... Comes with box template too!
I have cut from conqueror concept pink dew and Golden haze 250gsm card.. All settings and what you need to complete the finished item are within the template folders for you..


 So I had to get a move on. And after 8 solid hours and 45 mins I designed cut and assembled this below.
 craft robo
 Hope its ok.


Bookmarks